


The Gramercy Tools Bow Saw - 1
Design Considerations
Introduction
When we endeavour to introduce a new tool, the first consideration is what the optimum design for the tool should be. Though it might be tempting, we do not want to slavishly copy an old pattern. This is because one generally does not know enough about the context in which the design arose or exactly what the tool was originally used for. Sadly, too many designs have been "dumbed down" over the years, mostly because of cost. When we saw that there was a need for a really great turning saw, we wanted to make sure that we understood the classic saws' engineering so as to reproduce only their best features.
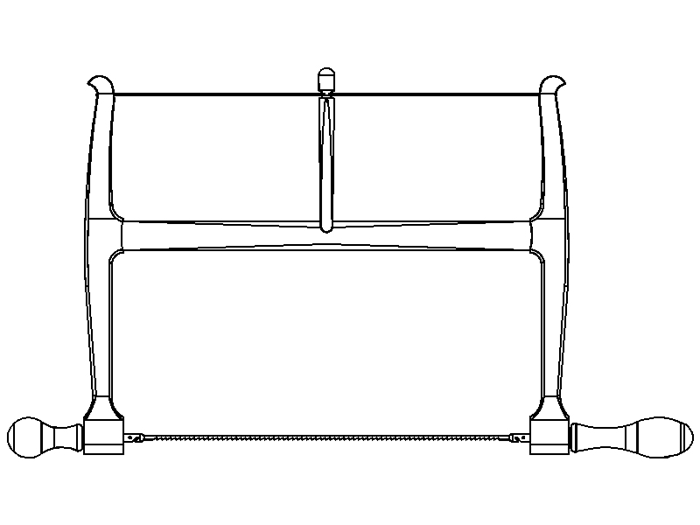
First, a bit on terminology. Any saw with a blade tensioned in a frame is generally referred to as a frame saw. To this day, European woodworkers use frame saws of around two feet long, with wide blades to do all their main cutting of boards. In the English and American traditions (after 1700 or so) woodworkers used handsaws for those tasks, and a narrow-tensioned blade in a frame saw only for cutting curves. These smaller saws are typically called either bow saws or turning saws. Very small versions with blades of around 6 inches are known as coping saws, and are naturally used for coping joints and other intricate work. The frame consists of a pair of mortised cheeks held apart by a tennoned cross-member called the stretcher. The hardware, or pins, hold the blade in the cheeks and also provide a mount for the handles. Finally, the tension on the blade is kept by a twisted cord, a Spanish windlass type of traction device kept from unwinding by the all-important toggle. The typical full-sized bow saw has a distance between the cheeks of about 8 -16 inches - typically 12 inches. This is the type of saw we wanted to reintroduce.
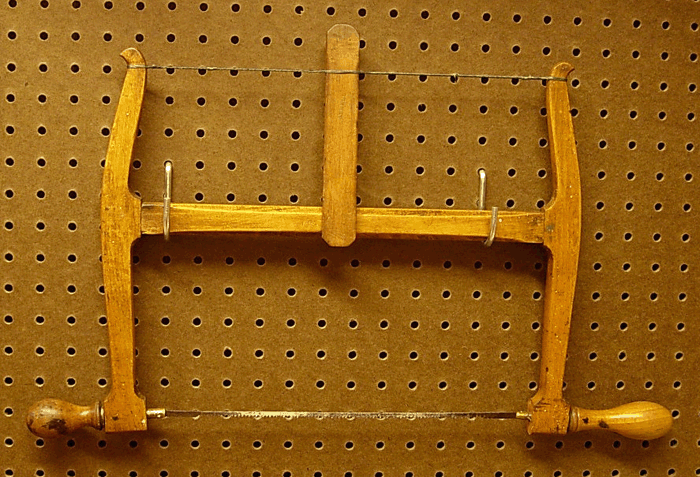
We looked at every bow saw we could find, yet, there are very few bow saws with a known history that have remained unchanged from a documented era of production. Two saws in particular fit that bill: one in the Seaton Tool Chest in England and another in the Duncan Phyfe Tool Chest at the New York Historical Society. We also looked to the bow saws in our collection, including an interesting one from the late 19th century.
The task at hand was then to understand why each part of the saw was built the way it was.
The Blade
 The blade on all the saws we looked at was a ¼"
wide band, held to the frame by a hole drilled into the blade and pinned
with a loose pin or a short nail. All the modern bow saw makers we know
use lengths of band-saw blades.
We hated the modern blades. What works for a powered
band saw is usually too aggressive or too dull for a hand saw. They are
almost always too wide as well, which means you can't cut a really tight
circle. That said, it's not so easy to drill a centered, 1/16" hole
on a blade that is much narrower. The antique saws had blades that were
also ¼" wide, but only at the ends for drilling the pin holes, the
part with the teeth was considerably narrower - making for a 3/16"
or 1/8" wide blade, with the gullets of teeth moving to the centerline
of the blade. These dimensions give a tighter turning radius.
We thought about re-grinding the backs of band saw blades
to create narrower blades, but modern band saw blades are more brittle,
and we don't like having the line of teeth off-centered.
Also, changing a blade fastened with loose pins can be
a pain the neck. You need to knock out the pins without dropping them,
and that's no fun. Then we had an idea; why not use coping saw blades?
They're narrow, inexpensive, and since the cross-pins are already installed,
you can just hook them into the frame.
As far as we know, we are the first company to offer
12" coping saw blades. They work like a charm! They're even narrower
than most early turning saw blades, so you can saw very tight radii (just
like a coping saw), but with a longer, faster, and smoother stroke and
switching out blades is trivial. Problem solved!
There is, of course, the question; should the saw cut
on the pull or push stroke? The advantage of saws that cut on the pull
stroke is that the blade stays in tension, but in a frame saw the blade
is in tension anyway and by pushing you get a lot more power. We tested
both ways many times and with the right blade, pushing seems to work much
better for most applications.
The blade on all the saws we looked at was a ¼"
wide band, held to the frame by a hole drilled into the blade and pinned
with a loose pin or a short nail. All the modern bow saw makers we know
use lengths of band-saw blades.
We hated the modern blades. What works for a powered
band saw is usually too aggressive or too dull for a hand saw. They are
almost always too wide as well, which means you can't cut a really tight
circle. That said, it's not so easy to drill a centered, 1/16" hole
on a blade that is much narrower. The antique saws had blades that were
also ¼" wide, but only at the ends for drilling the pin holes, the
part with the teeth was considerably narrower - making for a 3/16"
or 1/8" wide blade, with the gullets of teeth moving to the centerline
of the blade. These dimensions give a tighter turning radius.
We thought about re-grinding the backs of band saw blades
to create narrower blades, but modern band saw blades are more brittle,
and we don't like having the line of teeth off-centered.
Also, changing a blade fastened with loose pins can be
a pain the neck. You need to knock out the pins without dropping them,
and that's no fun. Then we had an idea; why not use coping saw blades?
They're narrow, inexpensive, and since the cross-pins are already installed,
you can just hook them into the frame.
As far as we know, we are the first company to offer
12" coping saw blades. They work like a charm! They're even narrower
than most early turning saw blades, so you can saw very tight radii (just
like a coping saw), but with a longer, faster, and smoother stroke and
switching out blades is trivial. Problem solved!
There is, of course, the question; should the saw cut
on the pull or push stroke? The advantage of saws that cut on the pull
stroke is that the blade stays in tension, but in a frame saw the blade
is in tension anyway and by pushing you get a lot more power. We tested
both ways many times and with the right blade, pushing seems to work much
better for most applications.
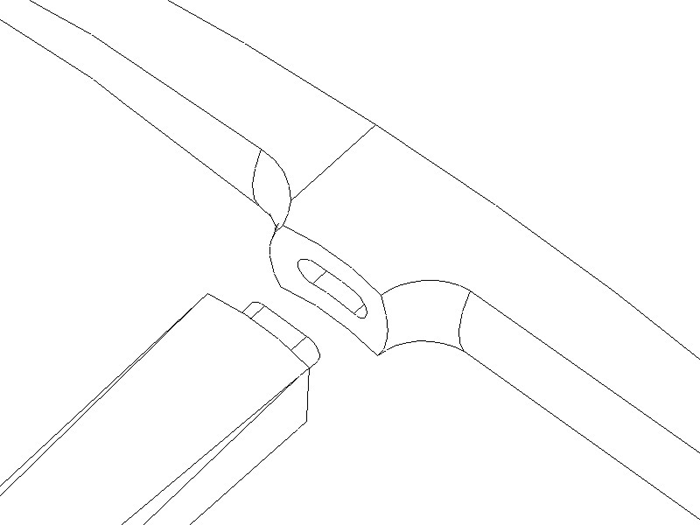
The Pins
The next problem was fitting the blade to the frame. Some more primitive bow saws used wooden fittings, but we felt that the cross-pins would eat at the wood over time. All the professionally made bow saws we examined used brass fittings. No problem! We machined a ¼" brass shaft with a slot and a hook in it. We also decided to include a regular hole so you could use old-style or wide blades. The pin has a shoulder machined in it eliminating worry about constant tension pulling the brass out of the handle.
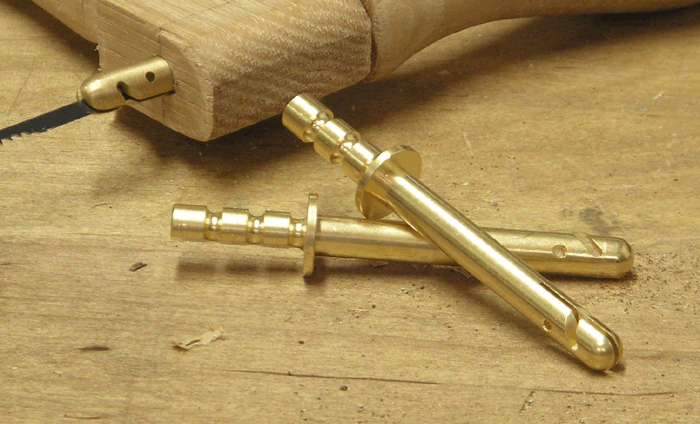
Another design issue: how to attach the handle to the brass? Some modern saws use an obvious solution - cross-pinning the handles to the brass. It's not that hard to do, but we wanted to offer a kit that could allow everyone to make a saw. That meant adding cross-pins to the kit, and the need to locate and drill through metal and wood rounds together. This is a real problem if you don't have the right tools. Gluing the hardware into the handle is simple enough, but brass doesn't readily stick to glue. So, our ultimate solution was to cut some grooves in the shaft and then file a single flat. When the glue hardens in the handle, it catches in the grooves to prevent pulling out. Glue on the flat prevents the brass from turning in the wood. With the tension on the blade taken firmly by the brass shoulder, the glue doesn't even have to be very strong.
Note: Holtzapffel's, great 19th century English compendium of tools and craft, illustrates a turning saw with loose pinned blades, but a hooked pin is on only one side, "so that the saw may be removed sideways from the one handle, and allowed to move as on a joint upon the other, a provision that is often turned to a useful account." We have no evidence that this design was ever manufactured in the 19th century.
The Handles
How big should the handles be? Why are the handles the way they are? Is the bigger handle on the old saws really too short for a modern hand? There is a common thought that woodworkers today have bigger hands so the handles need to be a little bigger than what's found on an antique. But how much bigger? A frame saw has two handles: a short and stubby one, called the toe, that is farther away from the user, and a closer one, which is bigger in all respects and used by the hand that pushes the saw.Then it hit us---The toe is only really used to turn the blade in relationship to the cheeks. You wouldn't normally hold on to it while sawing.
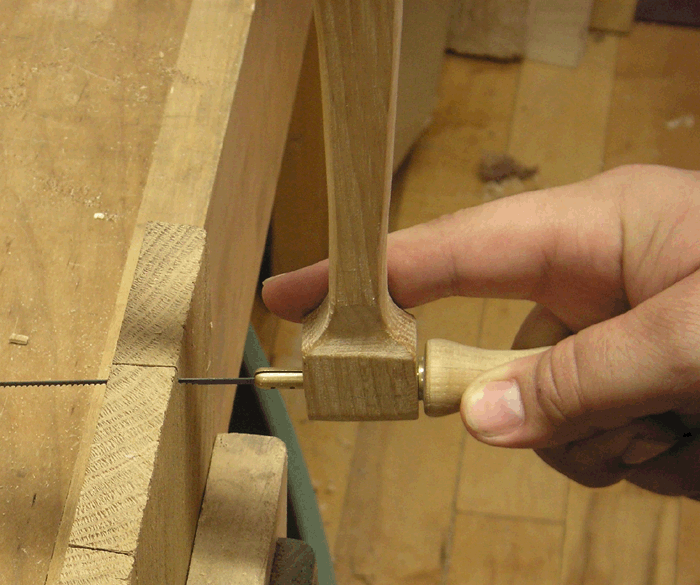 The handle is where all the action takes place and here
is where understanding how traditional saws are used is helpful. All western
saws (and planes) are used with the forefinger extended, like gripping
a pistol. It gives control. What happens when you extend
your forefinger so that it rests on the frame of the saw? First of all,
you need a short enough handle to bring your hand close to the frame,
but in use, we got all the control that we needed to cut fast, accurate
curves. It was really something. On some early saws we noticed a slight
concavity in the cheek, next to the handle--- a feature that disappeared
in the mid-to-late 19th century saws. Originally, we thought
was ornamental - some over-sculpting. Now we believe it to be the saw's
finger rest, an important feature that we chose to include on our saws.
The handle is where all the action takes place and here
is where understanding how traditional saws are used is helpful. All western
saws (and planes) are used with the forefinger extended, like gripping
a pistol. It gives control. What happens when you extend
your forefinger so that it rests on the frame of the saw? First of all,
you need a short enough handle to bring your hand close to the frame,
but in use, we got all the control that we needed to cut fast, accurate
curves. It was really something. On some early saws we noticed a slight
concavity in the cheek, next to the handle--- a feature that disappeared
in the mid-to-late 19th century saws. Originally, we thought
was ornamental - some over-sculpting. Now we believe it to be the saw's
finger rest, an important feature that we chose to include on our saws.
Finally, the handle needs to be short enough to rest in the palm of your hand. This way, your entire arm aligns behind the saw blade and it will be easy to saw straight. Too long a handle tilts the hand off to the side and the saw becomes harder to control.
Note: In many 20th century woodwkring instructions books, including ones by noted authors Bernard Jones and Charles Hayward, a two handed grip is shown. We have also noted the two handed grip in some early 20th century shop photographs. We think that the reason for the two handed grip, where one hand is holding on much as we demonstrate and the other hand is held over the first hand and also grips the cheek, comes from heavier saw frames of the post 1850 era where the frame was too heavy to stay in place as the saw was turned to saw a curve. A second hand keeps some of the weight off of the saw so you can turn it easily and it prevents the frame from twisting unpredictablely. We find in tests that the two handed hold works but there is a loss in stroke, some speed, and it is more awkward and there is a loss of control. However if your saw frame turns under the weight of the cheeks it is the only grip that allows predictable results.
The Frame
The early turning saws we looked at all had very thin, almost spidery frames. The reason for this, of course, is that the weight of the frame will influence the cut. When you turn the saw in the cut, you want the entire saw frame to move, so that the blade stays straight in the frame. A beefy frame will cause the saw to feel top-heavy in use. The handle will move with respect to the frame, twist the blade, and the cut will meander. We wanted a thin nimble frame.
This brings us to the question of the wood. A turning saw can be made from almost any wood that can take a little tension. The bigger the saw, the more tension it can take. A lighter-weight wood is preferable because of the nimbleness factor outlined above. The traditional wood that English companies used for these saws is beech, which works fine. However, good quality, straight-grained beech is hard to find in quantity. In the United States, we have oodles of great wood that is flexible, tough, and can tolerate a lot of tension: Hickory. Our saw is made of American Hickory. It is only slightly more than 11/16" thick at its thickest with the cheeks thinning toward the top. The stretcher is held in place with a shallow mortise that is intentionally over-long. The mortise exists to register the stretcher. A little slop allows the saw frame to adjust slightly as it goes under tension. We have seen saws where the stretcher is mortised in to the cheeks with a curved joint.This is handy when dealing with many different lengths of saw blade but with hickory, which is flexible, and of course with our factory made blades, consistent length isn't a problem. So, initially we elected to use straight mortise joints. However, upon further thought we realized with the extra hole our pins offer it would allow the use of a fairly wide range of blades and we decided to go with a curved mortise face.
Note: Bow saws in Vietnam (and perhaps other places) are used for everything, and the saw-makers there don't bother with mortising. The stretch is butted to the stiles and held in place by tension. This system works fine and greatly simplifies construction.
Another issue was where to put the stretcher in relationship to the cheeks. We found the positioning on the old saws, with the stretcher slightly above the midline of the frame, to function the best. This provides a little more depth of cut without throwing the weight of the saw too far back.
The next thing to consider: how to tension the frame.
We found several methods to choose from: (1) A twisted rope held in place
with some sort of a toggle that rests against the stretcher which is the
most popular method in the English and American tradition. (2) Catalogues
 the later 19th century show a sort of steel turnbuckle
in the middle. This appealed to our mechanical sensibilities, but otherwise
isn't stylistically pleasing and wasn't very popular. (3) In Europe, modern
big frame saws usually have a threaded rod with a wing nut at one end.
Again, not a very elegant solution. (4) In Vietnam, the frame is held
in tension by a wood or metal hook, and a nut at the end of the blade
holder tensions the blade. We liked the Vietnamese solution, but it complicates
the handle geometry considerably, and requires a new part for the top
of the saw.
the later 19th century show a sort of steel turnbuckle
in the middle. This appealed to our mechanical sensibilities, but otherwise
isn't stylistically pleasing and wasn't very popular. (3) In Europe, modern
big frame saws usually have a threaded rod with a wing nut at one end.
Again, not a very elegant solution. (4) In Vietnam, the frame is held
in tension by a wood or metal hook, and a nut at the end of the blade
holder tensions the blade. We liked the Vietnamese solution, but it complicates
the handle geometry considerably, and requires a new part for the top
of the saw.
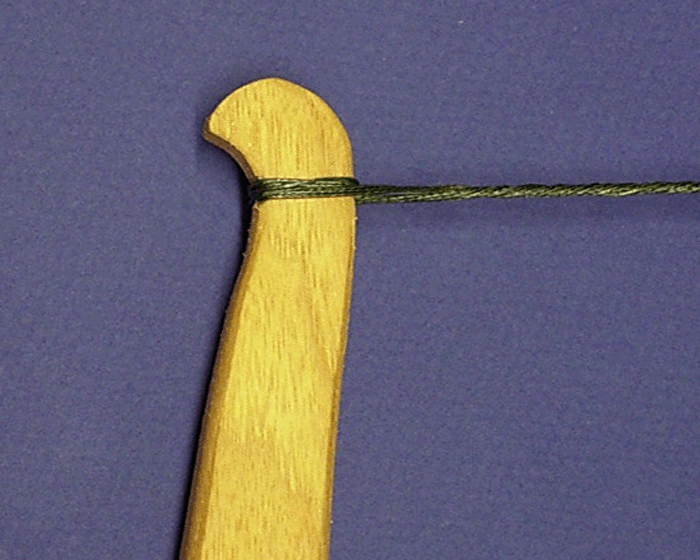
The best solution is the twisted rope. It's also the lightest option, which means it's the method that causes the smallest momentum effect on the sawing, especially with the rope all the way at the end of the frame. This is the method we chose, using heavy, braided fishing line, which is pretty darn strong. Most saws we looked at had a lot of twine of varying thickness and as you turned the toggle the toggle got harder to turn. However on examination we found this is because the toggle was spending most of its time twisting the rope, not bending the frame. We found that only a few loops, about 4 or so, allowed us to tension the saw very easily without increased difficulty in turning.
The Toggle
Almost all the post-1850 catalogs show a flat paddle intertwined between ropes that is twisted until it hits the stretcher, and has to slide between the ropes for clearance to be twisted further. The problem there is that it becomes harder and harder to slide the toggle between the twisted ropes as the ropes gain tension. We have seen a couple of recent solutions to this problem in which the toggle slides in a nut, which keeps the rope away from the toggle and gives the toggle a protected place in which to slide. We liked this solution, but even with the nut in place, the toggle gets harder and harder to slide up and down as the saw tensions. It wasn't until we looked more closely at some 18th century saws that we found an elegant solution. These saws use a swinging toggle - a turned piece with a groove at the top to locate the twine. The groove prevents the toggle from sliding, but its cross section where the ropes cross is thin enough so that the toggle can swing easily to clear the stretcher. It's an ingenious solution, provided the toggle is strong enough to withstand the compression and twisting. For this, hickory is particularly well suited, so it was the perfect solution for us.
That all being said the swinging toggle style is almost too easy to turn. With the sliding toggles as we said tensioning each turn gets harder. With the swinging toggle, coupled with only a few loops of rope, rotating doesn't get harder and even with the saw overtightend it's not hard to underestimate the amount of tension and easily add in another twist or two. The downside here is that you can be deceptively lulled unto overtightening the saw until it fails. We still love this method, but as people used to sliding toggles it took getting used to.
Summary
So, that's how we arrived at the numerous features of our saw. If you want a solid bow saw that captures the best of the early 19th century tradition, we urge you to consider getting one of our original Gramercy Tools bow saws. We are pretty proud of our engineering, and we think it's great value.
We are also happy to give you our drawings that reflect all our research and design if you'd like to make your own saw. We stock kits of blades, brass and turned parts so all you need to do is the woodworking. Even within the constraints of good engineering design there is an opportunity to make a customized saw that has nice aesthetics. Just be careful the wood you chose is clear, straight-grained and strong enough to take the tension you need to make the saw work. Remember, the bigger the blade, the more tension you will need.
|
Hours: M-F 9:00-5:00, closed Sat,Sun Our Guarantee & Return Policy Shipping and Sales Tax Info Privacy Policy Holiday Calendar |
|
Contact Us:
Email: support@toolsforworkingwood.com Phone: 800-426-4613 or 718-499-5877 Visit Us in Brooklyn: Directions to Our Showroom © 1999-2019 toolsforworkingwood.com Powered by 01 Inc. Coded entirely in NYC |