


|
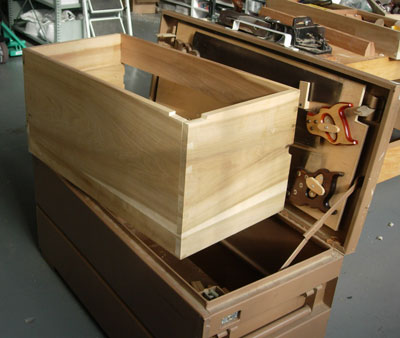 Knaack box for years and used it to lock up my tools. But in general I never kept much in the box because without proper storage I just had a jumble of junk which was hard to use. So once the lighting bolt struck with the idea of building a proper toolbox the first think I had to do was figure out how to mount everything. Some toolboxes have the saws in a slot in the front of the box but I didn't want to lose the space and as I needed to store 26" handsaws the early 19th century sliding thing on the lid was out too. However In order to attach mounts that hold the saws to the lid I first needed to add a lid liner to the lid.
 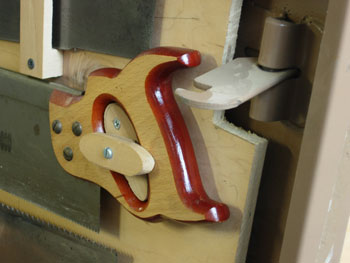 I left clearances for the inner rim of the toolbox and the two lock mechanisms. As I mentioned over the years I have moved around the saw attachments as I have changed favorite saws. Nothing is glued in so that I can always change it later on.
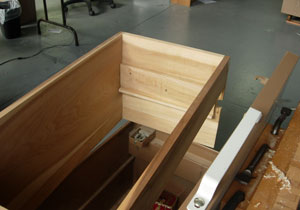 a tool stuck in the front won't slip in to the main case. The back liner is just wide enough to cover the area of the sliding tills. This gives me a little extra space at the bottom of the box, but I think the real reason I did it this was was because I happened to have a bit of poplar the right size.
 |
|
 Joel's Blog Joel's Blog |
 Built-It Blog Built-It Blog |
 Video Roundup Video Roundup |
 Classes & Events Classes & Events |
 Work Magazine Work Magazine |
| Newer Entries... | |
| Merry Christmas to All and to All a Good Night - 12/23/2007 |
| Vacation! (Time Off for Good Behavior) - 12/15/2007 |
| Stop Chamfers - 12/09/2007 |
| How to Saw a Circle with a Circular Saw. - 11/27/2007 |
| My Tool Box Part 3 - 11/18/2007 |
| POPULAR WOODWORKING's 2007 Best New Tools - 11/09/2007 |
| Split Nut Screwdriver - 11/05/2007 |
| Where is My Iron Ore? - 10/28/2007 |
| Norris Saw Collecting - 10/21/2007 |
| My Tool Box Part 2 - 10/15/2007 |
| My Tool Box - 09/29/2007 |
| Look at This! Look at That! - 09/05/2007 |
| How to Use a Marking or Mortise Gauge - 08/25/2007 |
| Sharpening your way to better woodworking - 08/18/2007 |
| Saw Filing - Poorly - 08/10/2007 |
| Postscript - 08/02/2007 |
| Move update - 07/28/2007 |
| Where is My Knife? - 07/26/2007 |
| Change - The End of an Era. - 07/21/2007 |
| We Are Movin' On Up - Out To Brooklyn!! - 07/18/2007 |
| Older Entries... | |
|
Hours: M-F 9:00-5:00, closed Sat,Sun Our Guarantee & Return Policy Shipping and Sales Tax Info Privacy Policy Holiday Calendar |
|
Contact Us:
Email: support@toolsforworkingwood.com Phone: 800-426-4613 or 718-499-5877 Visit Us in Brooklyn: Directions to Our Showroom © 1999-2019 toolsforworkingwood.com Powered by 01 Inc. Coded entirely in NYC |
This is exactly what I was hoping that you were going to do. Show the inside and how it all fits together. Sometimes I have trouble visualizing plans so a picture of how your sliding tills are put together helps me 'get it' a little bit easier. So I'm certainly for seeing more pictures of the guts of your box.
Thanks for the details of it so far as I look forward to seeing and reading more.
Michael
Will you be able to get into a bit of the design of the tills and such?
Chuck,
Were you able to get the book? I tried your email but it got bounced back. Perhaps Joel can give you mine.
Thanks and Joel, I am looking forward to seeing more on your tool chest.
All the best,
Michael