| | 09/12/2018 | 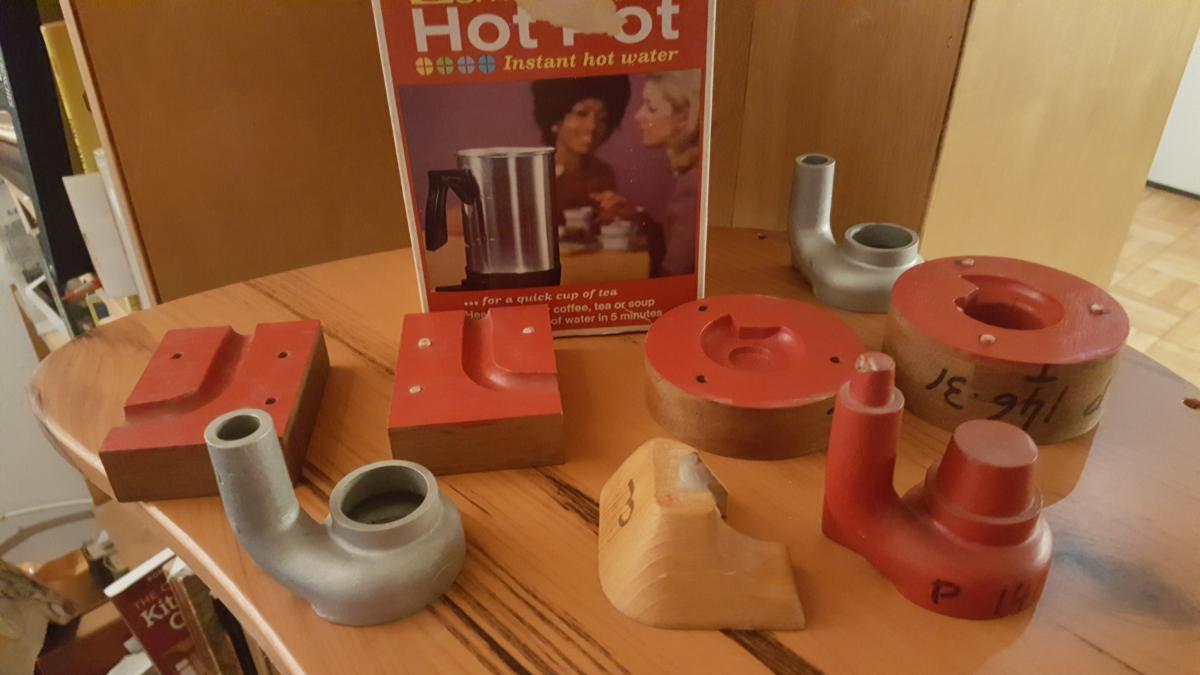
In 1980 I graduated from school and was offered a job at Black & Decker's industrial division in Hampstead, Maryland. I was assigned to work in the "Advanced Concepts Group" that was tasked with designing new tools that represented new directions for the company. Black & Decker's first cutoff saw and first big plumber's drill came out of that group while I was there (I had nothing to do with either project).
Being young and green, and knowing just a fraction of what I was supposed to - there was, and probably still is, a huge disconnect over what was taught in Engineering School and what you actually needed to know to hold down a job at a manufacturing company - I was assigned the task of designing a vacuum attachment for a masonry drill bit. We currently stock the Festool equivalent of these drills, but in those days they were big, noisy, and messy. It was either Hilti or Bosch that had just introduced a vacuum cleaner attachment for the rather large drill bits that the drills used, and Black & Decker was not going to be left behind. But the problem was, the competitive design was patented. I needed to understand the patent (which I could do) and come up with a better, non-infringing alternative (not so easy). The result wasn't guaranteed to hit the market, but the engineering department needed to be prepared if the existing product took off and marketing wanted a quick response.
I don't remember the details of the project, but I know it never saw the light of day. It was a big deal for me personally since it was the first time something I drew up became a prototype. The project was canceled just when I got the prototypes but before we ever found out if the prototype worked. (I think it would have worked but have been pretty clunky.)
In any case, this was long before 3D printing and CAD, so with guidance I drew out a design that was given to a patternmaker for making a mold to be test cast in aluminum.
Pattern making!! In the factory where I worked, Black & Decker maintained two large machine shops and a small pattern shop. Unlike the machine shops, the patternmaking shop was mostly precision woodworking. This was the only time in my life where I saw woodworking as a science. When you make furniture, things are mostly square. Cabinetmakers have to account for wood movement, but as long as the piece doesn't split apart, the actual measurement isn't that precise. Patternmakers have to work to extreme levels of precision. The patterns need to take wood movement into account and generally create molds that can come apart and be precisely reassembled. The skill level needed was huge. My little nozzle that was designed by a green engineer needed to be re-engineered and sculpted in wood and wax by a highly experienced and trained patternmaker. Because it was a small project, the job was outsourced to a trusted third party whom I never met. If I remember correctly, his name was Herman Egan. I was told he was top notch and perfect for this sort of small, tricky project. I designed the nozzle but had nothing to do with the pattern design or figuring out how to make it.
The project was canceled and when I left B & D the patterns came with me. They are a work of art.
Let me see if I can explain how this all works succinctly enough so you make it to the end of the page.
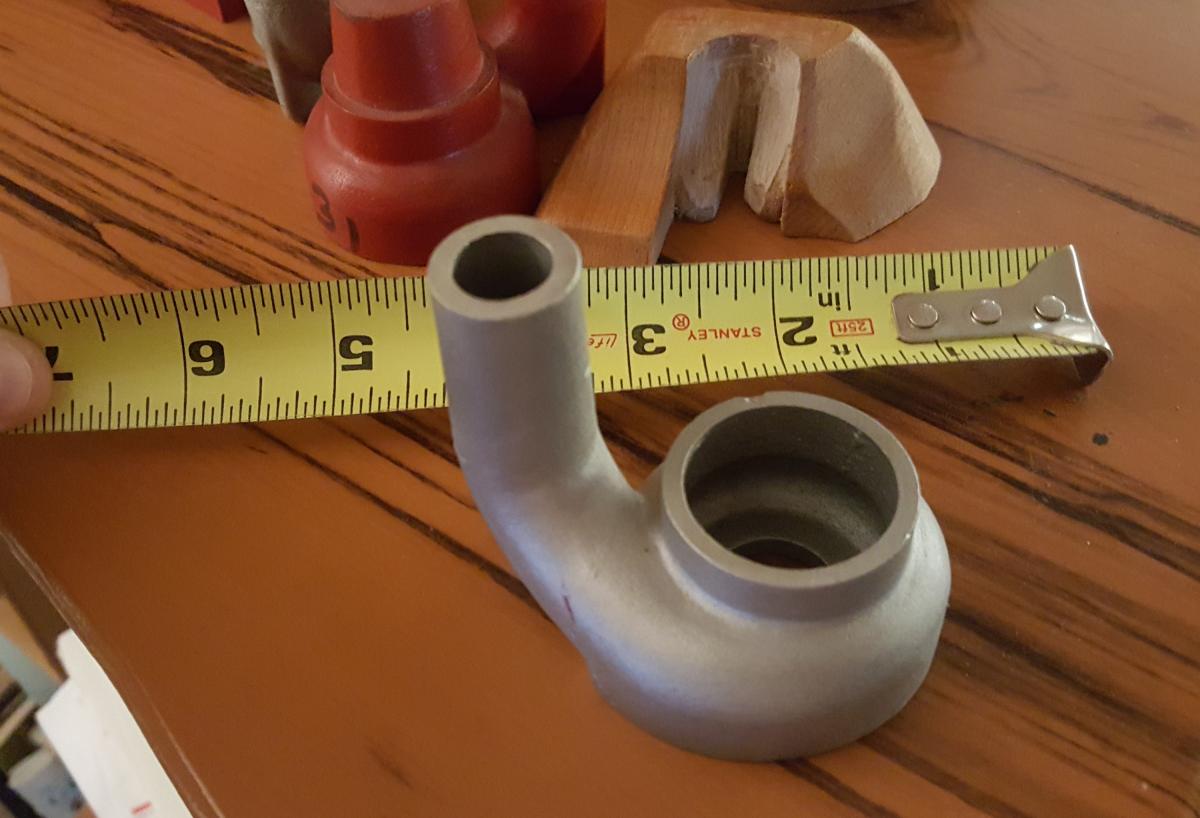
This is what we are trying to make. It needs some machining, but what you have is an aluminum nozzle that is hollow in the inside and also has an undercut on the outside of the nozzle so that the air flow is smooth. If this prototype were to go to real production, it would be a plastic die-cast piece. These days, using a CNC milling machine we could easily machine a prototype out of a solid block, or 3D print it out of plastic. In 1980 machining the complex curves was nearly impossible to manually machine so the decision was made to cast the prototype.
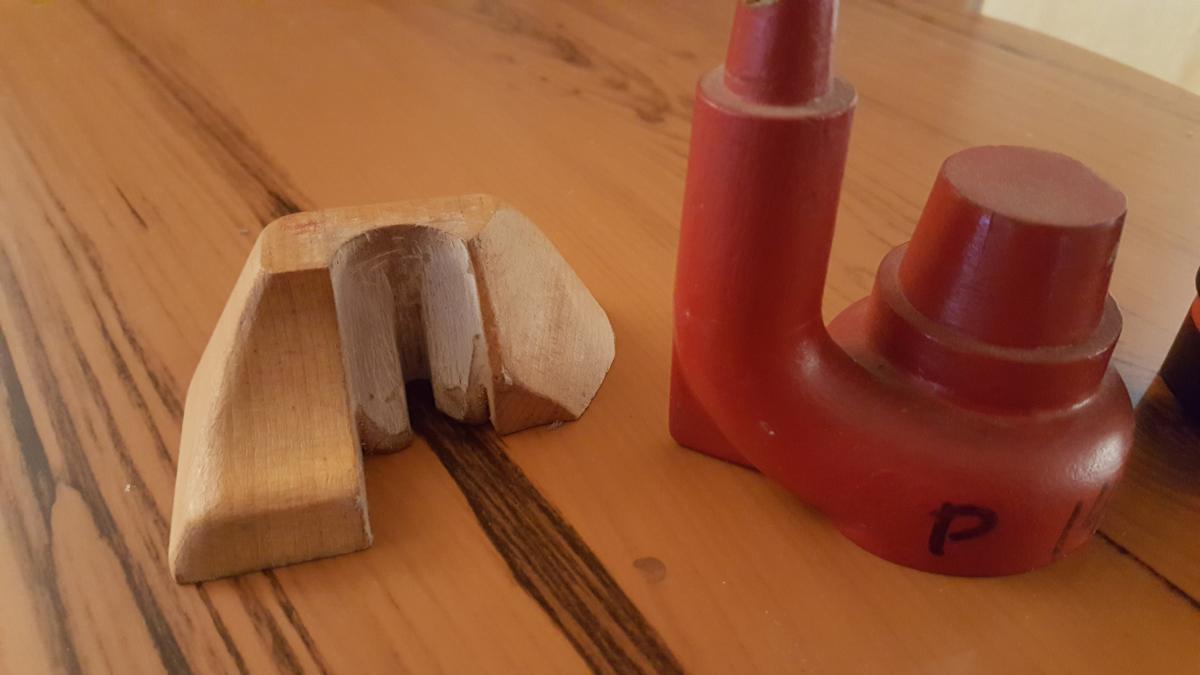
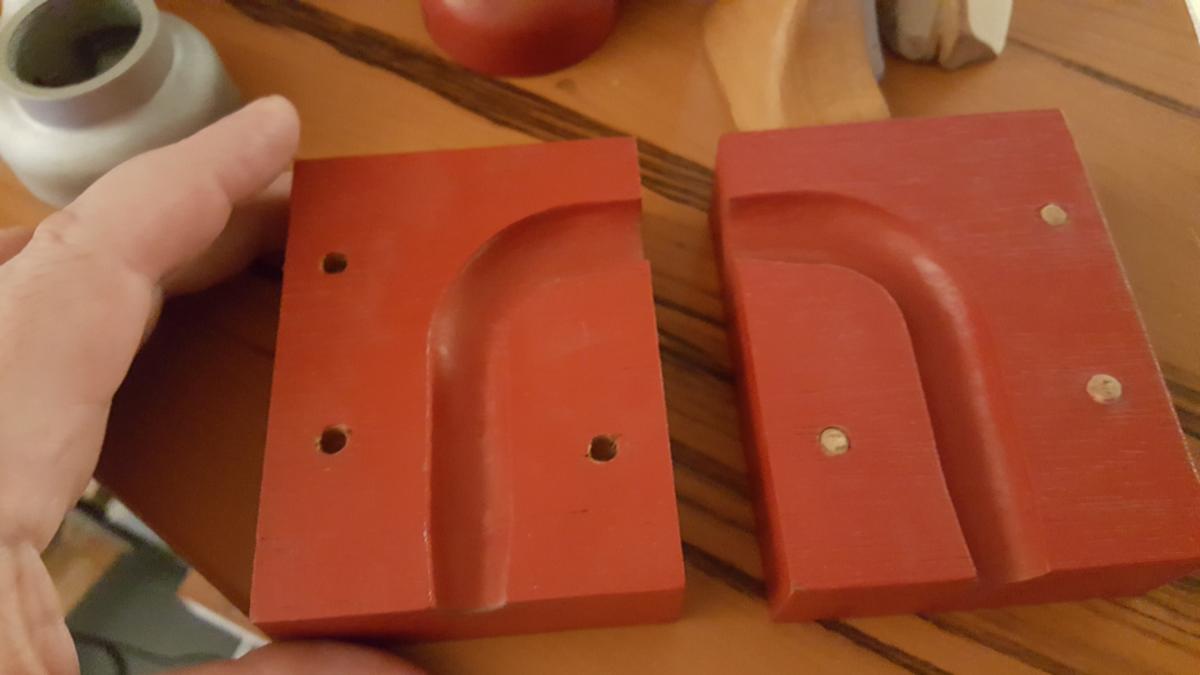
The way sand casting works is the patternmaker makes a positive object that is placed in a bed of wet sand and then removed, forming a cavity that is filled with molten metal. The metal shrinks a bit on cooling, so the pattern needs to be slightly larger than the final product to account for this shrinkage. If the object being made has holes, undercuts, or hollows after the main pattern is removed from the sand, the patternmaker will need to make and install cores (made of clay and sand) in the sand to keep the holes and hollows from filling with metal. The patternmaker is responsible for making the wooden pattern for the main object and the "core boxes" that are filled to form the cores. Mahogany is often used (especially on small patterns like these) because it is easy to carve, holds details, and is fairly dimensionally stable (and augmented with glued-up sections to make it even more dimensionally stable). While small, the pattern for this nozzle has two cores and a follow piece, making it a pretty complicated mold.
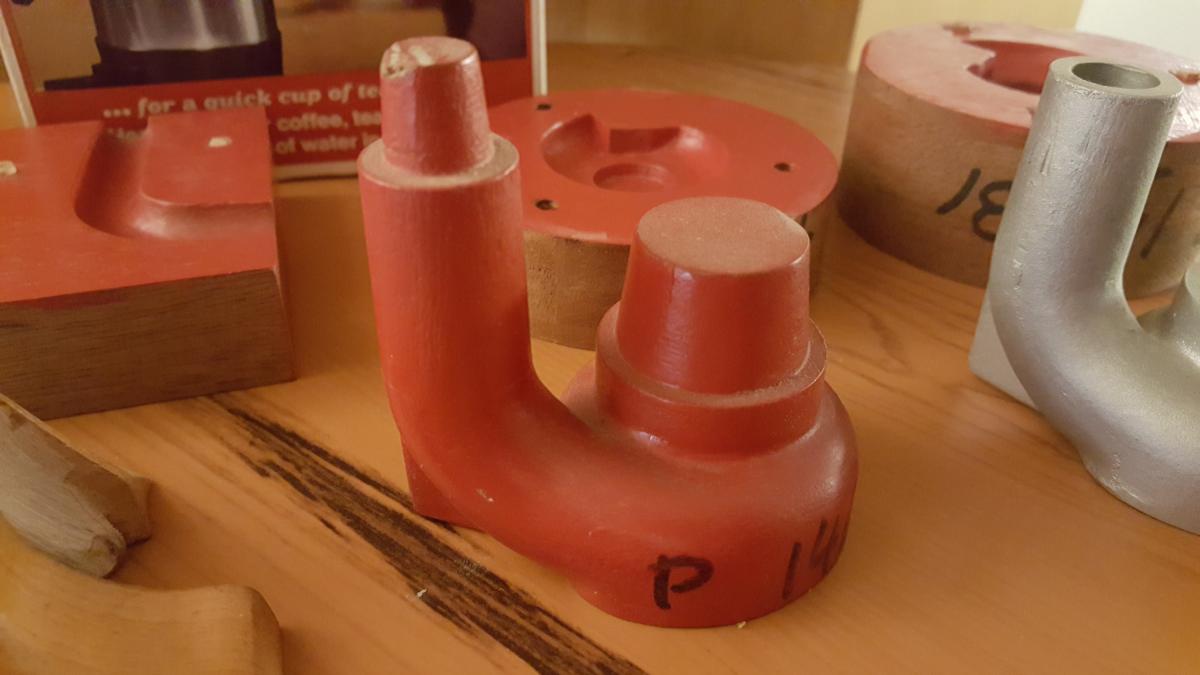
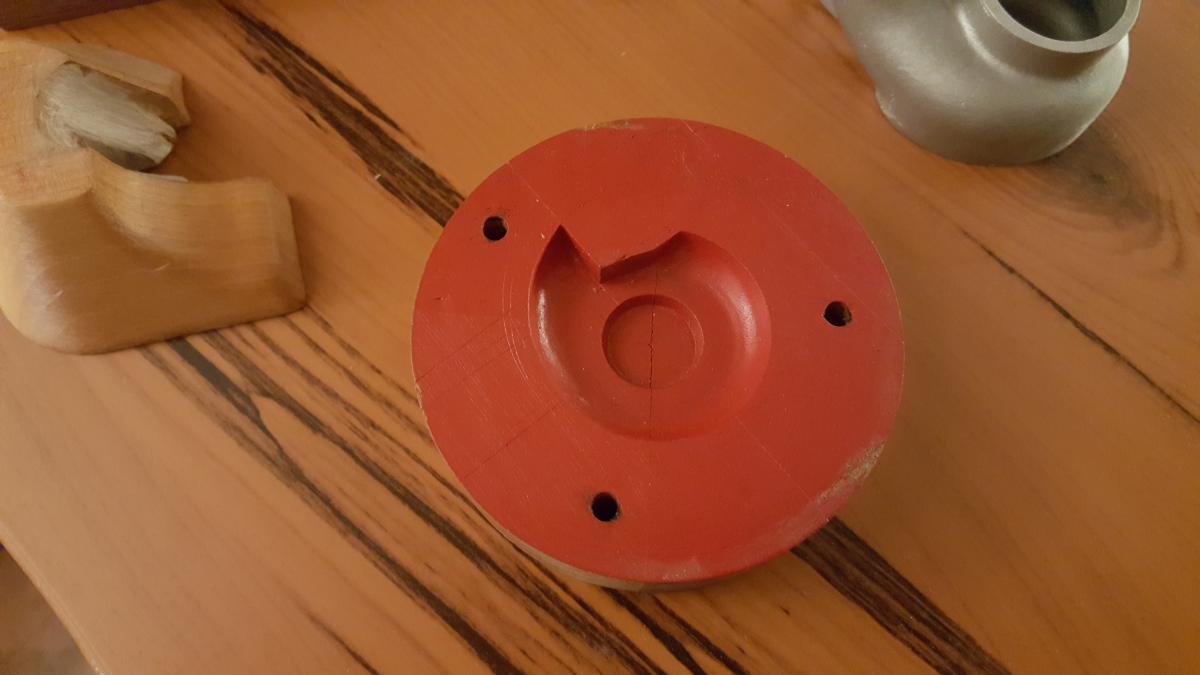
The main nozzle is precision turned and glued together with the nozzle outlet that was turned and carved separately. The two spuds on the top of the main pattern are extra and and hold the two cores in place. The first step in casting the nozzle is to put the nozzle flat on a board with the undercut piece. The undercut piece was carefully carved and fitted to fit over the rear fin and rounded hose bottom. Sand gets poured over the entire object and rammed tight. Then the mold is turned over and the undercut piece is removed.
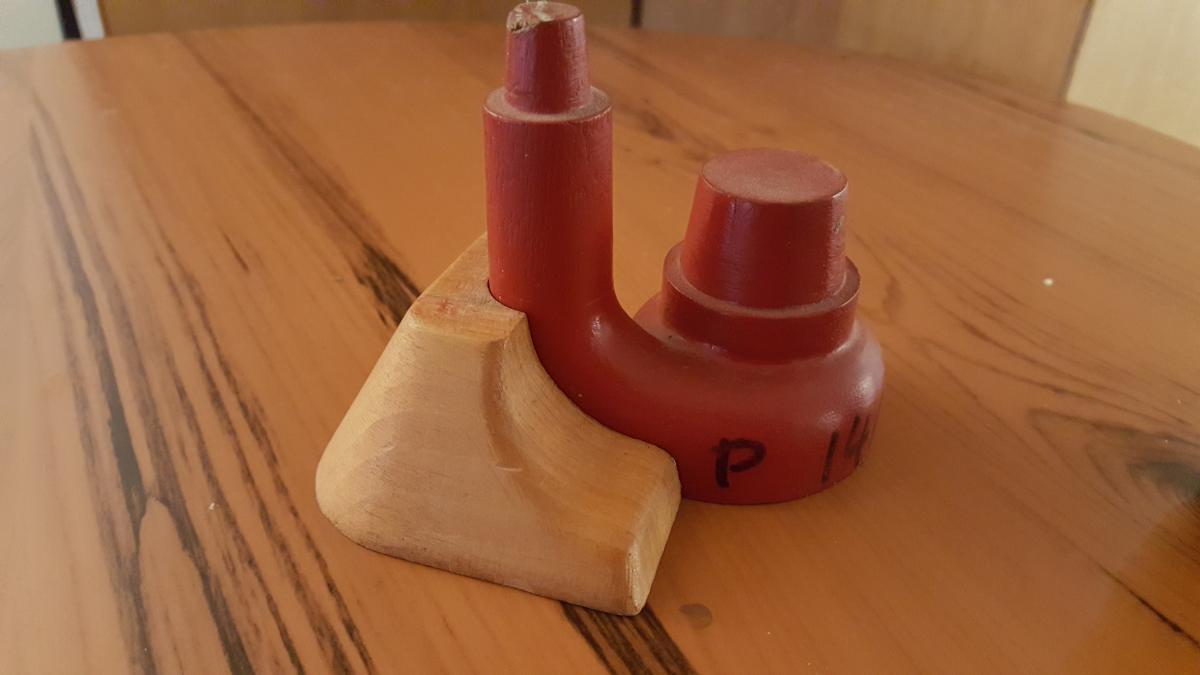
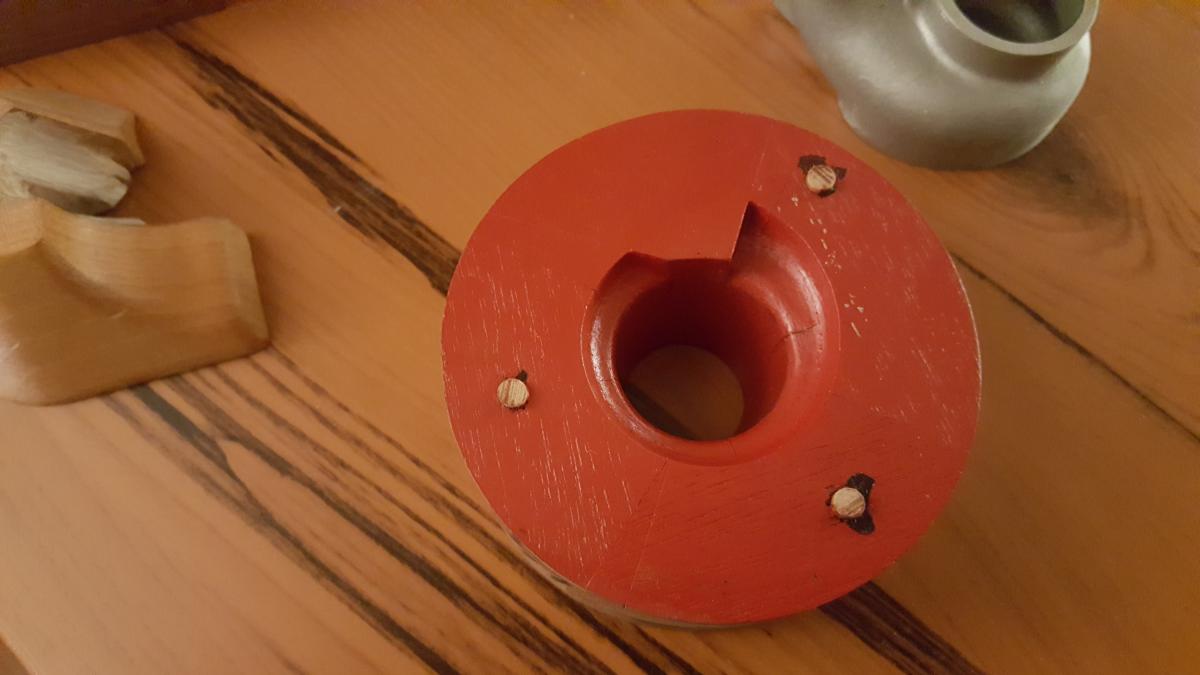
Both the pattern and undercut pieces have little holes on the bottom so the foundry can screw in a rod and lift out the two parts. With the undercut piece removed, sand is pour unto the space created and over the bottom of the nozzle. The two halves of the mold are separated and the red main pattern is removed. What we have is now a negative imprint of the nozzle in the sand.
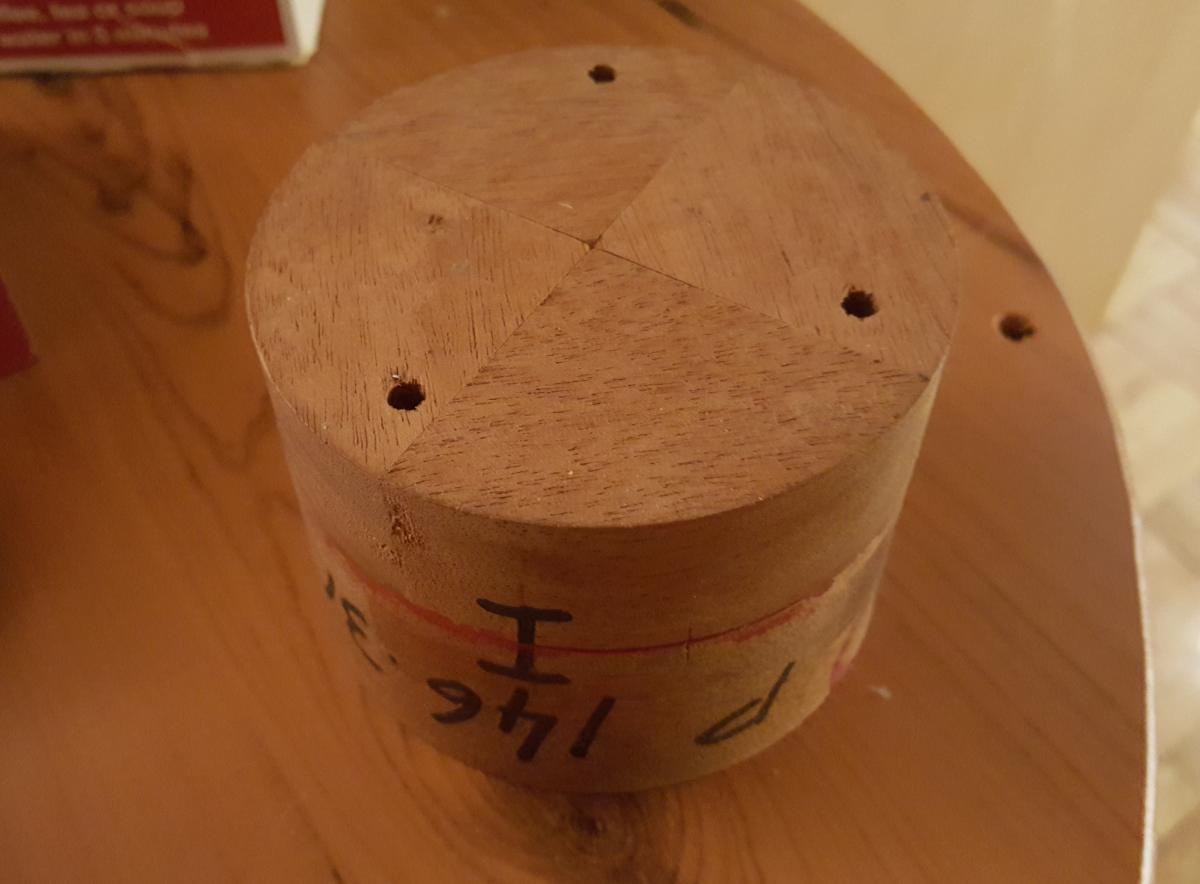
While this is going on, a clay-based core material is forced into the two core boxes. The box coxes are also mahogany, glued up for stability. The two halves have registration pins drilled through from the bottom so they the halves align properly. The insides were turned and then a bit of wood glued in. The spiral channel then carved to make the shapes. In order to get a good stable glue joint, the grain of the built up piece is aligned with the outer material. In the pictures you can also see the layout and scribe lines used to do this accurately.
The second core for the inside of the hose part is made the same way, with a glued up block and three registration pins. The core tapers in at the end so that is registers with the mold and that tapering suggests to me that the entire groove was carved by hand.
Unfortunately I don't have any cores.
By the way, the box in the back of the group picture is what I kept the pattern and parts in since 1981. I think I left the hot pot behind.
Since the 1980's this type of patternmaking has been done less and less. Wooden patternmaking is largely a thing of the past. This project would be 3D printed directly from a CAD system. Sand casting is still done, but the patterns in many cases are CNC machined from plastics, styrofoam and other synthetic materials, not wood. The huge range of specialty patternmaking tools - such as long patternmaker's scribing gouges - are no long made. Scribing gouges differ from carving gouges in that carving gouges are shaped with an arbitrary "U" shaped curve. Scribing gouges were readily available in specific curvatures in with both the bevel on the outside (out-cannel) or on the inside (in-cannel).
| Join the conversation | |
| The opinions expressed in this blog are those of the blog's author and guests and in no way reflect the views of Tools for Working Wood. |
|


 Joel's Blog
 Built-It Blog
 Video Roundup
 Classes & Events
 Work Magazine
Lots of talent in those old pattern makers!
Ditto old pattern and mold memories. An audit client in Acheson, KS manufactured the undercarriage assemblies using castings using sand patters that were more than 6’ square x 1’ deep. Amazing to watch them assemble the molds with the collapsible fillers for the hollow interior chambers. And even more impressive when they poured the molten steel into the molds.