|
|
08/22/2018 |
Actually we don't have mounting difficulties anymore - because we've solved them! (Except it's the end of August and everyone seems to be on vacation.) In reality, most of the first batch of mild steel planing stops are ready to go - the tool steel versions are machined, but not hardened. We already have bags of mounting screws ready to go. The real holdup is packaging, which should show up at the end of this week. This is of course really frustrating for me, since I want to get stops to everyone who has hit that "Contact me when in stock" button, but the packaging is designed to do three things: give a nice presentation when you get your stop; hold the screws and everything so they don't get dinged up or ding something else up while in transit; and make assembling the final product, stop and screws, fairly easy for us to do in production.
The "Mounting Difficulties" title really has nothing to do with production. One of the main point about our stops is that we don't advocate for a traditional mounting. We just released a longish draft installation guide - click to download the pdf that details a bunch of easy installation methods, including the method we have for mounting the stop at the end of the bench. This method beats every other method we tried and is really easy to do. Eventually we might offer a fancy hardware kit, but basically the mounting hardware we used in this case is just a couple of bucks.
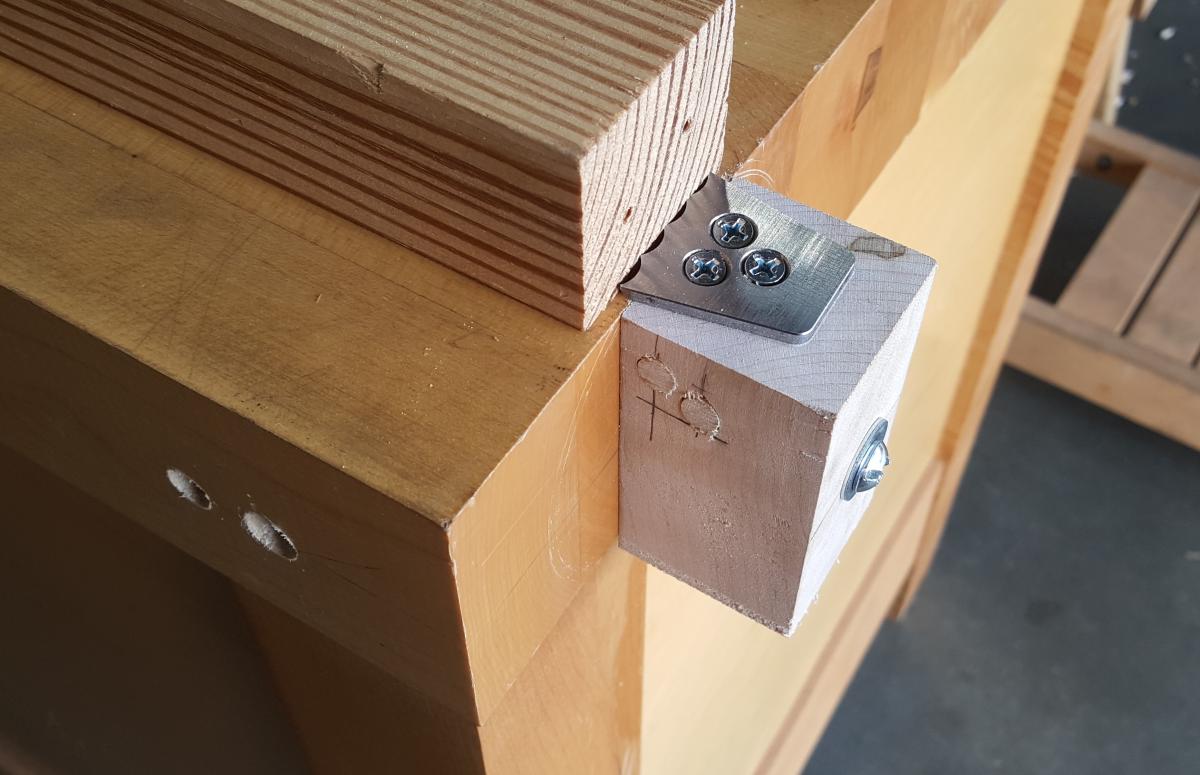
Most of the methods of mounting the stop start with screwing the stop down, using the three 1" screws we include with the stop into endgrain. Oy! The way we did it, or I should say the way I did it, was barely pre-drill and screw down the screw with very little torque. This has worked perfectly because when the stop is in use, the force against it is in shear and at a right angle to the screws, and therefore doesn't bother their position. The amount of torque a screwdriver exerts on a screw is considerably more than the force typically needed to remove the screw by pulling. Endgrain is a bit different because all you have is short little fibers keeping the screw hole intact. If you don't take care not to over-torque, the screw hole in endgrain the hole just strips out. I have installed at least a dozen stops in the past weeks, testing this or that, and sometimes a screw strips out. Pine, BTW, is the worst; oak and maple are better. But it still sucks.
The solution is pretty simple. I don't know why I didn't think of it three weeks ago. All you need to do is drill a couple of holes below the screw locations and tap in a couple of dowels (no need to glue them in unless they are loose). Then the screws will have something solid to grab into. You can even use a round chopstick if you want to. As long as the dowel is larger than the body of the screw it will work perfectly. I didn't even bother gluing the dowels in. I centered the dowels on the screws and pushed them in. The dowels function as wooden barrel nuts.
By the way, we are updating the installation guide and usage pdf as we get more experience with the stop so it will change over time.
As of this writing we are still not taking pre-orders, but we expect to open actual ordering for mild steel planing stops this Thursday PM or Friday AM. There is a link on the product page if you want an email reminder when the stops become available. Hardened steel stops won't be available for a few weeks or so and will cost more. The unhardened mild steel planing stops are $18.95. The price of the hardened steel stops have not been finalized but we're targeting the $35 - $40 mark. Until we harden a batch we won't exactly know the cost of the hardened stops. We have had loads of trouble outsourcing hardening so we recently got a tiny computer controlled kiln, with argon gas, so we can take operations in-house. The hardened stops will be its first job. Wish us luck.
|
Join the conversation |
|


 Joel's Blog
 Built-It Blog
 Video Roundup
 Classes & Events
 Work Magazine
I enjoyed reading the instructions. One of the reasons I shop at TFWW is the amount of information/explanation you provide. Good job and thanks!
What about mounting the stops on ash or hickory blocks that can fit in this slot between the two halves?
This way they can be removed or slid down to another position
Do you see any problems with this install?
thanks for personalizing your website. it feel good to order items from real people in the united States
See the link to the instructions. It’s a machine bolt into a barrel nut buried into the benchtop. A just drilled an oversized hole in the block with the stop. A slot works well too just a little more work.
Mark.
I honestly can’t exactly visualize what you are describing but it will probably work. The real contribution I think we are trying to make is show people multiple easy ways of mounting the stop for use. Once mounted they are very handy for both modern and traditional woodworking. We only detailed about a half dozen methods in the installation guide but there are so many different types of workbenches and dozens more easy, practical, installation ideas that are perfectly great.
Also, I was thinking, prior to reading your suggestion, of just using one of my bench dogs, which are 1" square. Have you consifdered that? It's in the pdf here on the site. all the best Charlie