|
|
06/14/2011 Bevel Angle |
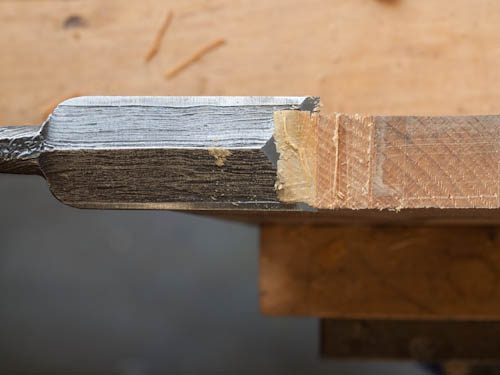 Just for jollies take a sharp chisel and pare some cross grain of a board. Work at the end of the board and you will find it's easy to pare end grain. Then try cutting the same cross grain but not at the end of a board. It's impossible isn't it? The reason is that the amount of force needed to cut the cross grain is pretty small but the amount of force needed to push the wood out of the way of the chisel bevel is pretty huge. Just for jollies take a sharp chisel and pare some cross grain of a board. Work at the end of the board and you will find it's easy to pare end grain. Then try cutting the same cross grain but not at the end of a board. It's impossible isn't it? The reason is that the amount of force needed to cut the cross grain is pretty small but the amount of force needed to push the wood out of the way of the chisel bevel is pretty huge.
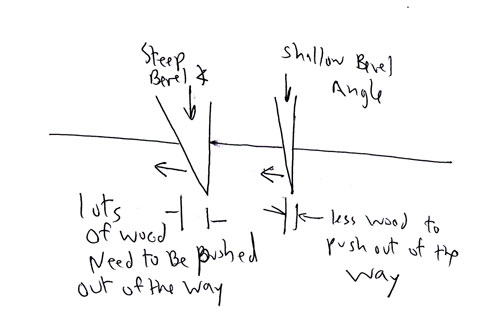
With a mallet of course we can easily go pretty deep before the forces get too great and the chisel jams. There are several solutions to this: Use a narrower chisel - less force is needed so for the same effort we can go deeper. (fig. 2)Use a shallower bevel angle. That helps a lot and for the same force the section of wood we have to push out of the way is less so we can go deeper. The problem is that a narrower chisel doesn't give us the clean cut lines we need and a chisel with a lower bevel angle has a weaker and less long lasting cutting edge.
 The correct approach it turns out is a compromise between penetration and edge longevity. It also turns out to be a compromise between control and precision and edge longevity. The correct approach it turns out is a compromise between penetration and edge longevity. It also turns out to be a compromise between control and precision and edge longevity.
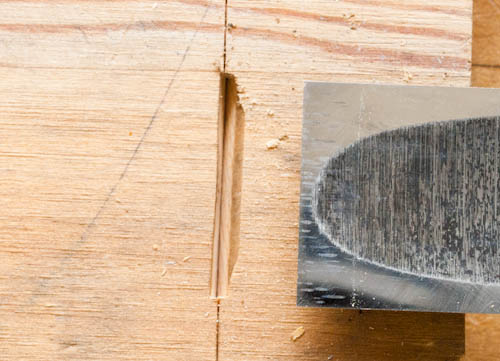
Before we tackle the first set of problems there is also an additional problem to consider. As we chop down into the wood the bevel bears again the cut and tries, successfully, to push the chisel past the initial cut line (fig. 3). This is most annoying, it means that when we chop out the waste from a dovetail by putting the chisel on the scribe line we will go below the base line and ruin the fit of the joint.
While the first set of problems are annoying, the baseline problem is critical. So lets look at the base line problem first. If we reduce the bevel angle of the chisel we can reduce the lateral force on the chisel to reduce how far it moves but it will still move.
There are several solutions to this problem that are in general use:
1 - Cut away all the waste that the chisel bevel will push against. This is a pretty common modern method and it works. You use a fretsaw or a coping saw to saw out the waste so that when you put the chisel on the scribe line there is nothing blocking the body of the chisel and it goes straight down. With the waste removed the cut is like paring end grain and it works precisely. But it's one more step and requires another tool. It does mean that with the waste removed you can put the chisel exactly on the scribe line and the chisel will track true.
2- In Lonnie Bird's dovetailing video (no longer available) he uses a narrow chisel to remove all the waste by chopping. He starts at the edge of the boards and nibble his way to the scribe line bit by bit. I don't know of anyone else who teaches it this way but the method works.
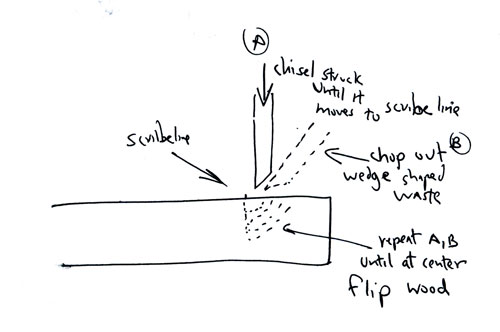
 3 - This is how I was taught: Place the chisel in the waste a little bit in front of the scribe line and mallet the chisel until the chisel moves to the scribe. Then hold the chisel bevel up and smack it into the end grain, removing a chip the depth of the chisel cut. Once the first bit of waste is removed the chisel has a wall at the scribe line and additional chiseling won't move the scribe line back. You repeat the process until you have removed as much waste as you want. Halfway through I flip the work and work from the other side. This technique works great but you have to move the chisel in your hand, and possibly use a different size chisel for chip removal. There is also no support for chiseling on the flip side. 3 - This is how I was taught: Place the chisel in the waste a little bit in front of the scribe line and mallet the chisel until the chisel moves to the scribe. Then hold the chisel bevel up and smack it into the end grain, removing a chip the depth of the chisel cut. Once the first bit of waste is removed the chisel has a wall at the scribe line and additional chiseling won't move the scribe line back. You repeat the process until you have removed as much waste as you want. Halfway through I flip the work and work from the other side. This technique works great but you have to move the chisel in your hand, and possibly use a different size chisel for chip removal. There is also no support for chiseling on the flip side.
 4 - Frank Klausz demonstrates dovetailing using a technique similar to what I learned and the first step of chiseling just before the scribe line until the chisel is forced back to the scribe line is the same. Once the scribe line is defined by the chisel he backs off a little and chops out a wedge of waste. He uses a chisel a little narrower than the joint so that he doesn't have to switch chisels and he also doesn't have to flip the chisel over or change position. This method is really really fast and how I currently do it. He then repeats the operation, chiseling at the scribe line to it goes deeper, and then chipping out a larger wedge. Halfway through he flips the work and works from the other side. This method also gives better support for the waste on the flip side. 4 - Frank Klausz demonstrates dovetailing using a technique similar to what I learned and the first step of chiseling just before the scribe line until the chisel is forced back to the scribe line is the same. Once the scribe line is defined by the chisel he backs off a little and chops out a wedge of waste. He uses a chisel a little narrower than the joint so that he doesn't have to switch chisels and he also doesn't have to flip the chisel over or change position. This method is really really fast and how I currently do it. He then repeats the operation, chiseling at the scribe line to it goes deeper, and then chipping out a larger wedge. Halfway through he flips the work and works from the other side. This method also gives better support for the waste on the flip side.
In part 2 we will address the issue of bevel angle - trying to find a compromise between edge retention, force, control, and there are a couple of tricks we can use that make stronger edges without increasing the first needed to make the chisel work.
|
Join the conversation |
|


 Joel's Blog
 Built-It Blog
 Video Roundup
 Classes & Events
 Work Magazine
Looking forward to part two. Jeff Peachey
Just one more thought on the blog post, though. As Joel says, a chisel set in the baseline and struck with a mallet will tend to cut down past the line, as shown in the picture. That's because the chisel is trying to push the same amount of wood away in two opposite directions. This was a revelation to me, and my dovetailing got neater once I adjusted my work accordingly. I now take out the waste between pins with a coping saw, but chisel out the waste between tails, a hybrid between methods 1 and 3.
Tor