|
|
10/09/2012 |
 Four years ago (June 08) I wrote an article for Fine Woodworking Magazine on how to use a high speed dry grinder. It was a popular article and I still see it referenced today. The method that the article suggested involved slightly cambering the grinding wheel, a technique I learned from Barry Iles. Four years ago (June 08) I wrote an article for Fine Woodworking Magazine on how to use a high speed dry grinder. It was a popular article and I still see it referenced today. The method that the article suggested involved slightly cambering the grinding wheel, a technique I learned from Barry Iles.
Four years later I think some clarification on how I use the cambered wheel might be in order.
 The point of the camber isn't to make an effectively narrower wheel. It's to allow control when grinding. The point of the camber isn't to make an effectively narrower wheel. It's to allow control when grinding.
Fig 1 is a side view of what happens when you start grinding. - the iron touches the wheel at one point on the bevel. As you grind you end up with Fig 2 - where the wheel has formed a hollow grind. As you can see, the cutting edge of the blade never touches the grinding wheel until you are done.

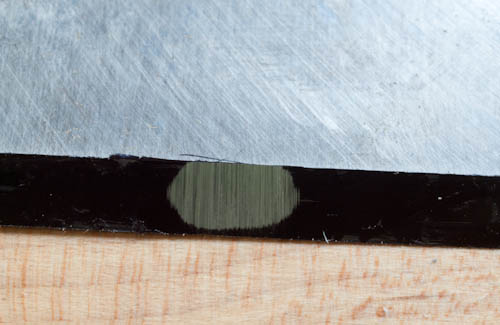
At the center of an iron when starting to grind with a cambered grinding wheel you get fig 3 - again a point contact, but as you grind (let's just assume for a second you are not going back and forth on the rest) you get fig 4. It's important to realize that the cutting edge is still straight across because we haven't touched it yet. The first photo shows the 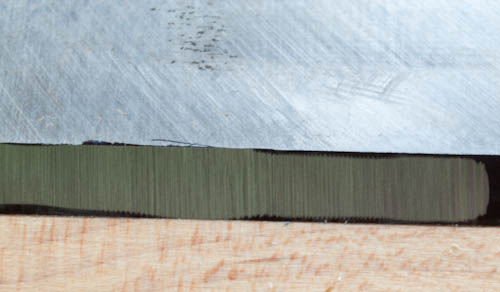 grind marks on an iron where I just touched the blade to a cambered wheel (the cutting edge is downward). The grind marks form a football shape because of the convexity of the wheel. The next photo shows the same iron after I start moving it back and forth on the rest and in the close-up you can see that the grinding isn't perfectly even and the section in the middle is ground a little deeper and I am close to the cutting edge but not there. grind marks on an iron where I just touched the blade to a cambered wheel (the cutting edge is downward). The grind marks form a football shape because of the convexity of the wheel. The next photo shows the same iron after I start moving it back and forth on the rest and in the close-up you can see that the grinding isn't perfectly even and the section in the middle is ground a little deeper and I am close to the cutting edge but not there.
So far so good. The camber on the wheel makes it possible for me to easily control where I am grinding and keeps me from overly grinding the corners of my iron where it is easy to burn stuff.
 You can see that as long as the camber of the wheel is very shallow (like it is) I am grinding almost the full width of the wheel once I get going. When I start I have a small point of contact and lots of control, as I get more and more hollow ground, I am also in contact with, and grinding, using more and more of the wheel's width. You can see that as long as the camber of the wheel is very shallow (like it is) I am grinding almost the full width of the wheel once I get going. When I start I have a small point of contact and lots of control, as I get more and more hollow ground, I am also in contact with, and grinding, using more and more of the wheel's width.
But wait - there's more!!
In order to get an even hollow I need to move my iron back and forth, with the camber I can easily control how much pressure I use. I do this by tilting the blade into the wheel as I grind.
Of course as I am doing this I am paying attention to the heat in my fingers from the grinding and visually checking how far I am gone and what parts of the iron still need work.
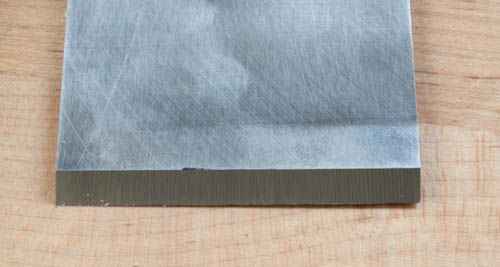
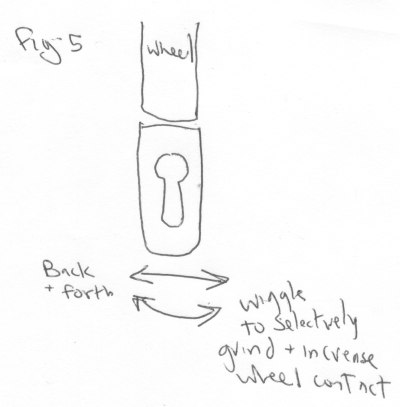
You can see on the left in the last photo of the finished iron that the scratch marks aren't perfectly parallel to the marks in the center of the grind. This shows the result of tilting the iron into the wheel (fig. 5). With tilting I have a reliable way to grind quickly or ease off on the sides of the iron. This is very important at the end of the process when I am frequently picking the iron up, seeing where I need to grind more and replacing the iron on the rest. I push forward, making contact with the wheel and then tilt the iron into the wheel as I move back and forth, This gives me a lot more control than if I tried to just move the iron by eye perfectly straight left to right.
 Getting rid of most of the hollow took about 20 seconds (plus two stops for photographs). I had noticed when I started grinding the wheel was a bit dull and it could have used a dressing but I waited until I was near the end of the process so that I had a fresh clean cool wheel for the last, most "risky" bit. So without moving the rest or anything I did a very light dressing just before the final steps. Then I ground what's left of the hollow and every few seconds picked up the iron to look at to I could make sure I am grinding evenly. It took about 30 seconds more. There is a small, easily felt, evenly sized burr on the back of the iron which tells me that I have ground to the edge. It is even across the iron so I must have ground evenly. Getting rid of most of the hollow took about 20 seconds (plus two stops for photographs). I had noticed when I started grinding the wheel was a bit dull and it could have used a dressing but I waited until I was near the end of the process so that I had a fresh clean cool wheel for the last, most "risky" bit. So without moving the rest or anything I did a very light dressing just before the final steps. Then I ground what's left of the hollow and every few seconds picked up the iron to look at to I could make sure I am grinding evenly. It took about 30 seconds more. There is a small, easily felt, evenly sized burr on the back of the iron which tells me that I have ground to the edge. It is even across the iron so I must have ground evenly.
During the entire grinding process the iron never got more than warm. I used a 6" 3600rpm grinder with 60 grit 3X wheels.
Try it yourself - it's easy.
Note: To make the camber on the wheel I just used a multi-point diamond dresser. Fine Woodworking has the original article available somewhere in their on-line archive.
|
Join the conversation |
|


 Joel's Blog
 Built-It Blog
 Video Roundup
 Classes & Events
 Work Magazine
Joe
Grinding to a wire edge or a line is just like planing to the line. You pay attention to what you are doing, as you approach the line you plane selectively if you need to, and with a bit of practice you get a sense over how heavy a cut you can make, and where to apply pressure.
This makes such good sense, much like the control with a cambered plane blade.
Any suggestions on using your method with the wide grinding wheel on a Tormek?
Thanks.
Rob
I don't have a tormek so I don't know, but isn't the whole point of the machine the jigs and setups?