| | 03/09/2011 |
The trash gods of Bushwick giveth and they taketh away on Monday, Wednesday and Friday. Last night they were generous, and brought forth their sweet fruits ripened and flavorful.
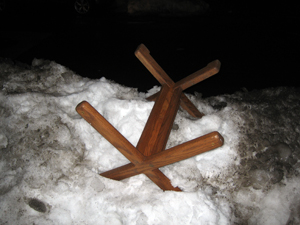
I had been watching this table sit inside a gated yard for two weeks. So when I saw it on the curb on my way back from the store, I was so excited that I picked it up and immediately returned to the bodega for axuillary beverages.
Back at home, I started to take it apart. The table had been shored up with a big steel X which unscrewed to reveal some lag bolts with very interesting bits of dowel stuck to them. A double fix?!? Most unusual. I popped the feet off and checked for broken nails. The lag screw holes were covered with dowel ends-- which quickly succumbed to the overtures of Mr. Screwdriver.
The triangles between the two central webs popped off, but left some nails.
To pry apart the central pillar, I used a chisel (one of the ones I'd bent on the tornado log of yesteryear.) When separating glued boards, Ive found it to be important to pry up hill so the board doesn't split. Happily, the glue job was only so-so on the face, and really poor on the doweling.
I pulled the nails and used my bow saw to flush-cut the dowels. While I was at it, I cut a notch in the Lucky Bench's skirt for clamping.
I cut my stock to length with a carcase saw. Even though I dont know what the finished product will look like, I bother with this step because I know I wont use the Dado-ed counter bored center section of the wood for my project, and removing it leaves me with a shorter length to joint. This is especially helpful when your work surface is as flat as mine.
Ready set STOP!
When I can, I use a stop rather than a vice and dogs. I prefer to remove material with my number 3 because its lightweight. For jointing I like a longer plane. I own a number 7 so thats what I use.
It took a while to bring the boards down to a point at which they had square edges, but who doesn't like planing?
When Im close to the finished dimensions I use a small combo square and pencil scribbles and xs to mark what I want to remove and what I dont. I haven't developed a unified language of marks, but I think you can understand my strategy from the photos.
The initial face gets flattened, unwound, and marked with an R and an arrow to show the planing direction. The secondary faces get an R and an arrow when they're square to the first face, and the fourth face (yes I just counted 1, 2, 4) gets NOTHING! Actually, I mark the planing direction and put Xs on it so I remember not to reference off of it. The 5th face gets awesome.
Creating only as many reference faces as I need for layout is something I do constantly when metal working in the shop at TFWW. If Im manipulating sheet goods I usually only need one square corner, and sometimes not even that. In some cases you can use a single edge.
Now Ive got 6 pieces of square, flat wood, a page full of sketches and almost no idea what Im going to make, but if you look closely you can see the medullary rays on my new stack of trash.
| Add a Comment | |
| The opinions expressed in this blog are those of the blog's author and guests and in no way reflect the views of Tools for Working Wood. |
|


 Joel's Blog
 Built-It Blog
 Video Roundup
 Classes & Events
 Work Magazine